The problem
You’ve designed your Next.js website, and now you need to deploy it (and maybe even build it) on your production environment which uses the Plesk control panel, but it’s just not playing ball and nothing loads.
Plesk – Node, but not quite as you know it
Plesk can be interesting when it comes to running anything that makes use of Node, due to the way that it runs sites and makes sure they’re still up and running.
Normally you’d run:
node run start
and your Next.js based app/site would be up and running. With Plesk we can’t easily do that and have requests sent from the web to Next (proxied).
First, we build
Before we can get round to running our app, we need to actually build it if you’re not building an optimised version in your dev environment and uploading it – If you are, then you can skip this step.
As we’re on Plesk, we’re going to tweak our Next config to avoid the dreaded “Error: spawn EAGAIN” issues when building our app by setting the experimental features in our next.config.js file:
Now we’ve got that out of the way, we can build our app:
npm run build
> [email protected] build
> next build

warn  - You have enabled experimental feature (cpus) in next.config.js.
warn  - Experimental features are not covered by semver, and may cause unexpected or broken application behavior. Use at your own risk.

info  - Need to disable some ESLint rules? Learn more here: https://nextjs.org/docs/basic-features/eslint#disabling-rules
info  - Linting and checking validity of types
info  - Creating an optimized production build
info  - Compiled successfully
info  - Collecting page data
info  - Generating static pages (4/4)
info  - Finalizing page optimization

Page                                       Size     First Load JS
┌ ○ /                                      5.5 kB          107 kB
├   /_app                                  0 B            77.1 kB
├ ○ /404                                   194 B          77.3 kB
├ λ /api/send                              0 B            77.1 kB
└ ○ /contact                               2.81 kB         104 kB
+ First Load JS shared by all              77.1 kB
  ├ chunks/framework-4556c45dd113b893.js   45.2 kB
  ├ chunks/main-7ca0c04a95757ac7.js        30.5 kB
  ├ chunks/pages/_app-4a09cd1a90ca64b6.js  546 B
  ├ chunks/webpack-69bfa6990bb9e155.js     769 B
  └ css/4aee9269a78b31a4.css               3.11 kB

λ  (Server)  server-side renders at runtime (uses getInitialProps or getServerSideProps)
○  (Static)  automatically rendered as static HTML (uses no initial props)
No we’re all built we can get round to running our code.
Running – The solution(s)
There are actually two solutions to this problem, the one you’ll commonly find if you Google for how to run Next with Plesk, and the one we prefer as it keeps things simple and doesn’t require modifying Next if you don’t want to run in dev mode all the time. We’re only going to cover our method, as it doesn’t mean you’ll wake up one day to find you’ve updated Next and been running in dev mode for weeks by mistake.
Enter Express.js (again)
It’s a familiar story with Plesk, setting up an Express.js shim to make things work nice, so that’s what we’re going to do again.
Inside your websites document root, we’ll assume it’s the only domain on the account, so it’ll be httpdocs, you want to create a new file called server.js and put the following in it:
The purpose of this “shim” is to take the requests from the web server using Express and pass them to our Next app (the handle() method), whilst taking some environment variables from the Plesk web interface and passing them in as well – no need to modify the next module!
Before that will work though, you’re going to want to add Express to your dependencies else it’ll be errors all the way down:
npm install express
Configure Plesk
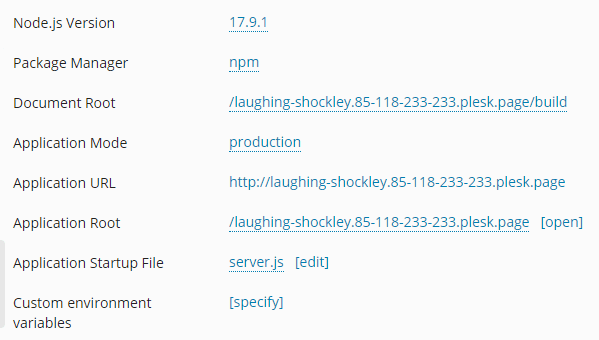
Now we’ve got our building blocks in place, we need to configure Plesk:

Let’s break the settings down:
- Node.js version
- This is the version of Node you are using for your application, make sure to pick an appropriate value
- Package manager
- Select the package manager you are using, most commonly this is npm
- Document root
- This is where the static output of
npm run buildis located, by default for Next this would be/.next/static, but we prefer something more obvious - This directory has to be inside of the Application Root (see below)
- This is where the static output of
- Application mode
- Are we running in production or development?
- Application URL
- This one is fairly explanatory, it’s where we’ll be accessing the site/app from
- Application root
- This is where you’ve uploaded all your files to, if it were the only domain in the account this would be
httpdocs
- This is where you’ve uploaded all your files to, if it were the only domain in the account this would be
- Application startup file
- This is our Express shim we created earlier
- Custom environment variables
- These are any additional env vars we want to pass to our app
Once these are all set you should find that your app now loads in your browser without issue.
Remember, if you’re having trouble diagnosing why a customer site won’t run, get in touch, that’s why we’re your partner, we’re here for you and your customers.


