Video Transcription
Hi there, Dean from KDA here.
Today, I’m going to talk to you about HTTP to HTTPS redirection in WordPress, basically the redirection from unsecure to secure.
If you are not using HTTPS, you really should be. Browsers will flag your site as unsecure, which really does not look good to your visitors.
We have noticed when sites get moved to us. Most of them let WordPress deal with this. This slows down the site by making unnecessary PHP requests. Check out the link below for a guide of how to fix this.
It is really worth checking out as it will improve your site’s load times. If you’re not sure how to do this, just give me a message or comment below. This is one of the many optimizations we make for our managed WordPress customers.
As always, I’m Dean from KDA and I’m here to help.
How to speedup your HTTP to HTTPs redirects
As Dean already mentioned in the video, it’s best not to let WordPress, or any application really, handle redirecting your users from the HTTP (unsecured) version of your site to the HTTPS (secured) version as it involves loading your application code to make it happen. It’s far better to let the web server that runs your application do this, as it’ll be many times quicker.
We’re going to show you how you can do this for the following scenarios:
- Apache
- Cloudflare
- LiteSpeed
- NGINX
- Sucuri
Before we jump in to that though, it’s worth mentioning a couple of other things with regards to HTTPS/SSL/TLS and making sure your site is quick and secure for your users.
HTTP Strict Transport Security (HSTS)
HSTS is a web technology that allows your site to tell web browsers that for the next X days, your site should only ever be accessed via HTTPS. There are two ways for your site to do this:
- When your site is first accessed, the server sends information (in a HTTP header) to the browser to tell it
- Your site has been added to the HSTS preload list used by browsers, so it already knows about it before users even try
Option 2 is the best option, but it does require that all of your sub-domains also use HTTPS e.g. portal.example.org, app.example.org etc. as HTTPS will be forced for all of them. You can also specify the same for option 1, but crucially you don’t have to if for some reason you need to keep plain HTTP for one or more of your sub-domains.
We’ll show you how to configure HSTS for each server as well.
Upgrade Insecure Requests
Upgrade-Insecure-Requests is another HTTP header that the server can send to browsers, it tells the browser if they find a resource on your site that is attempting to load via plain HTTP then it should instead load it via HTTPS. This can prevent messages telling your users that the connection to your site isn’t secure because you’ve got a stray image loading via HTTP etc.
You’ve guessed it, we’re going to show you how to configure this as well.
Configuring your web server
Important: Before you change any files or settings, please backup your configuration files first, just in case something goes wrong.
Apache and LiteSpeed Enterprise Server
LiteSpeed Enterprise Server is a modern, faster, drop in replacement for Apache so it can be configured in the same way, with a .htaccess file in the root/base of your website.
Let’s go through line by line and look what this does:
- Check if
mod_headersmodule is present and if it is, run the next two lines - This line tells the browser to remember to load the site as HTTPS for the next 12 months (
max-age=31536000), to include sub-domains (includeSubDomains) and to allow the domain to be added to HSTS preload list (preload). ThepreloadandincludeSubDomainsare optional. - Make sure all resources are loaded via HTTPS if they are linked to via plain HTTP
- Stop the requirement for
mod_headersto be present - intentionally blank
- Check if
mod_rewritemodule is present and if it is, run the next 4 lines - Enable the
mod_rewritefunctionality - Check and see if the request is coming via HTTPS
- Check if the request is *not* on the domain
example.org(useful where you have the .uk and .com of your domain going to the same site) - If either 8
[OR]9 are true then send the request to the same location onhttps://example.orginstead and indicate this is the correct home (R=301) - Stop the requirement for
mod_rewriteto be present
Now when a user accesses your site via http://example.co.uk, https://example.co.uk or http://example.org the request will be redirected to https://example.org instead and the browser informed to always use HTTPS.
NGINX
NGINX is a popular alternative to Apache due to being much faster and an alternative to LiteSpeed Enterprise Server due to being free to use unlike LiteSpeed.
The configuration is a little more involved as it might be in one of several locations depending on exactly how NGINX was installed.
However it was installed, you’ll want to look for the configuration file for your site and look for something similar to:
Once you’ve found this, you want to add the following after the server_name entry shown above:
This tells NGINX that all HTTP requests for example.org and www.example.org should go to https://example.org instead.
You might want to add a similar block to make sure if someone loads your site via https://example.co.uk or https://example.net they go to https://example.org as well:
To make sure our site and content gets loaded via HTTPS we can add the HSTS and upgrade headers. To do this we need to look for the configuration similar to:
Once you’ve found this, you want to add the following after the server_name entry shown above:
Once you’ve made the changes, you’ll need to reload NGINX so that it sees them.
Configuring 3rd party services
Cloudflare
Cloudflare is a popular security and CDN service that offers a range of services and pricing levels, including free.
Once you’ve logged in to the Cloudflare portal and select your domain, then click the blue SSL/TLS icon along the top and now click “Edge Certificates”:

Once on here, you’ll see a toggle switch for “Always use HTTPS” as shown below, make sure it is green with a tick:

Now we’ve got plain HTTP users going to our HTTPS site, we want to make it a bit quicker still and make sure browsers start with HTTPS rather than HTTP, so if we scroll down a little we should se “HTTP Strict Transport Security (HSTS)”:

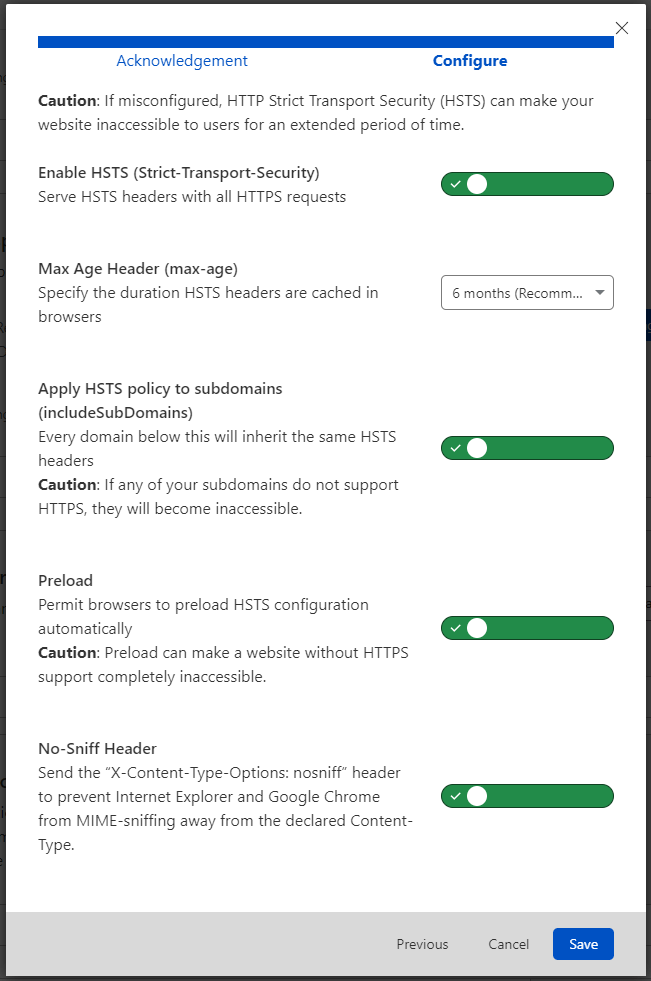
Clicking the “Change HSTS Settings” button will bring up the screen where you can configure your HSTS options, first you’ll need to read the warnings and acknowledge you understand them, then you’ll be presented with the configuration screen:

The configuration screen also has a “No-Sniff Header” option and we’d recommend you enable this as well. We’ll cover this HTTP header more in the future.
Cloudflare doesn’t really have an option to add the Upgrade-Insecure-Requests header, they have their own system which achieves the same end goal, address re-writing that looks at the content your server is sending to the browser and changes http to https for all items on your domain. To enable it you’ll need to go back to the “Edge Certificates” screen and look for “Automatic HTTPS Rewrites” and enabled it:

You’re now all set for speedy redirects and making sure we can avoid them where possible.
If you’ve got multiple domains pointed at your website e.g. example.co.uk and example.net and want them all to end up on one domain, example.org, then you’ll need to add each of those domains as new free accounts inside Cloudflare and then add page rules for each domain.
Sucuri
Sucuri is a security platform primarily aimed at WordPress users (talk to us if you’re interested in using it) that also provides a CDN service and is somewhat similar to how most people use Cloudflare.
Once you’ve logged in to your Sucri control panel and clicked through to your domain, click the “Settings” menu, followed by “HTTPS/SSL”:

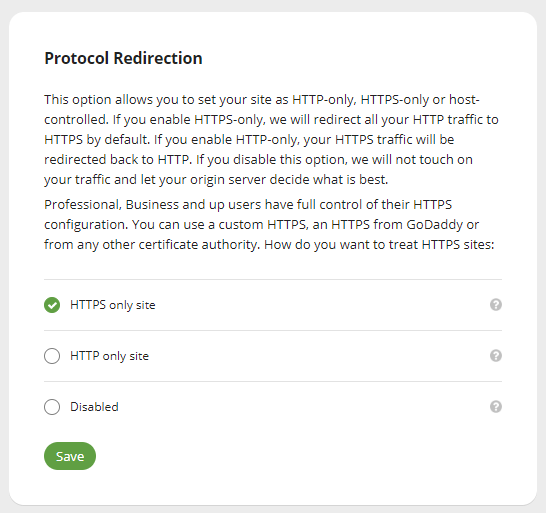
Once the screen has loaded, scroll down to “Protocol Redirection” and select “HTTPS only site” and click “Save”:

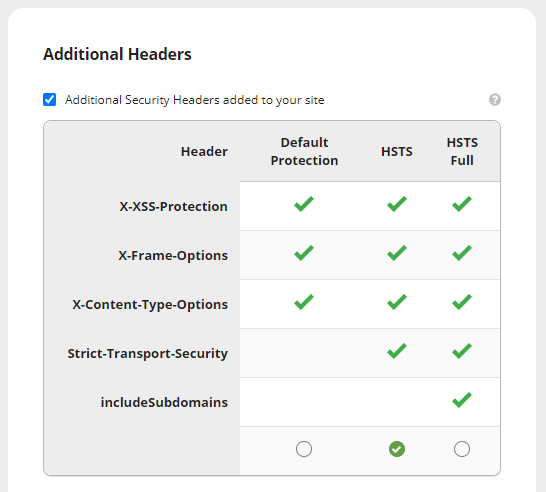
Now we’ve got plain HTTP users going to our HTTPS site, we want to make it a bit quicker still and make sure browsers start with HTTPS rather than HTTP. If you look next to the “HTTPS/SSL” menu item we clicked earlier, you should see “Security”, click this menu link. Once the screen has loaded you should see the “Additional Headers” section:

You’ll need to make sure the checkbox at the top for “Additional Security Headers added to your site” is ticked, and then select if you want to use HSTS with or without sub-domain support by ticking the appropriate selection at the bottom, then clicking “Save Changes in the Additional Headers”. This will also add some other security protections for your users, which we’ll cover in a future blog post.
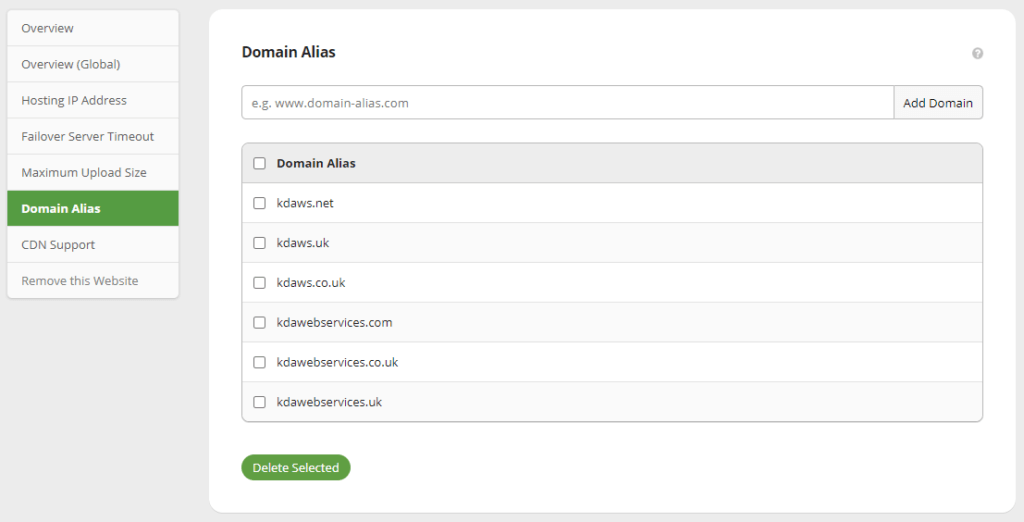
If you’ve additional domains such as example.co.uk and example.net that you need to go to your website then you can easily do this. If you click the “General” menu item, and then “Domain Alias” in side menu you will be presented with a screen to add the additional domains:

You’re now all set.
Wrap-up
We hope you’ve found this a useful guide, if there’s a service you think we should cover then please let us know.
As always, if you need any help or you’re thinking of making use of a 3rd party security service such as Cloudflare, Sucuri or cWatch, get in touch as we’ve experience with, and make use of all three services.


